
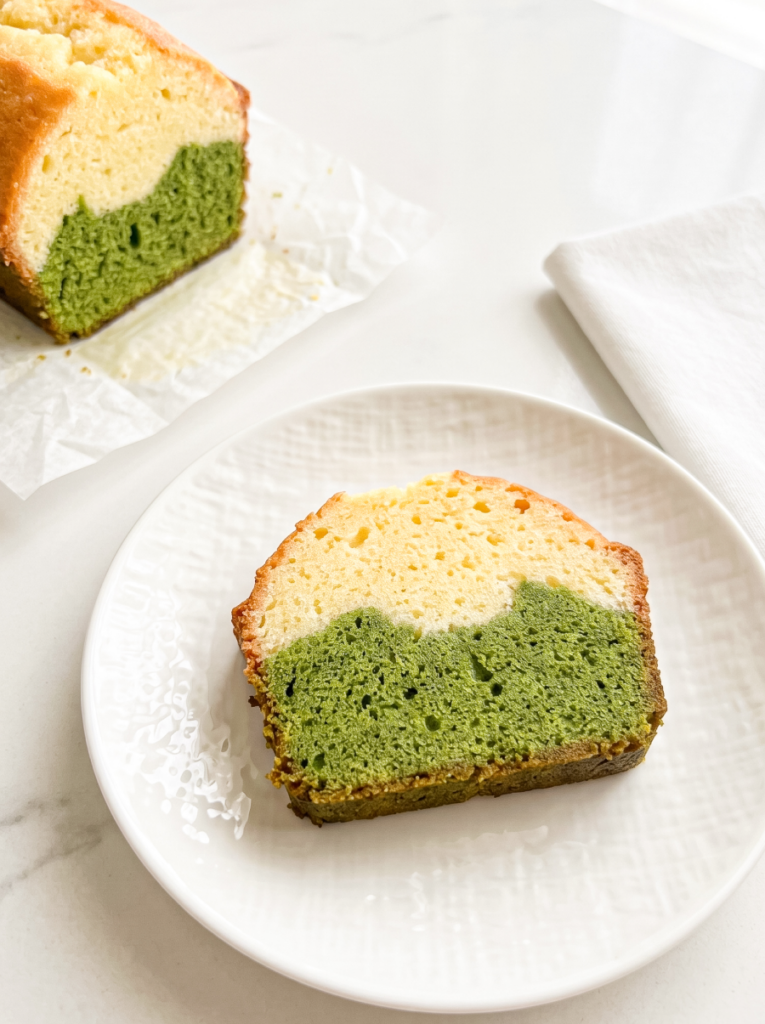
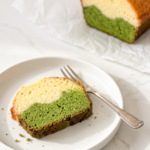
I’m genuinely a little obsessed with this matcha latte pound cake right now. It tastes exactly like that earthy, slightly sweet matcha latte you get from your favourite coffee shop, as a cake. It’s got that specific kind of matcha vibe that doesn’t hit you over the head with bitterness.
Most pound cakes can lean a little dense, maybe even dry if you’re not careful. But this one has a super tender crumb that almost melts in your mouth. And honestly, it gets even better after a day in the fridge!! I know, patience is hard, but that 24 hour chill lets the flavours deepen and the texture becomes significantly better. It’s a small step that makes a HUGE difference, and I will not be taking questions.

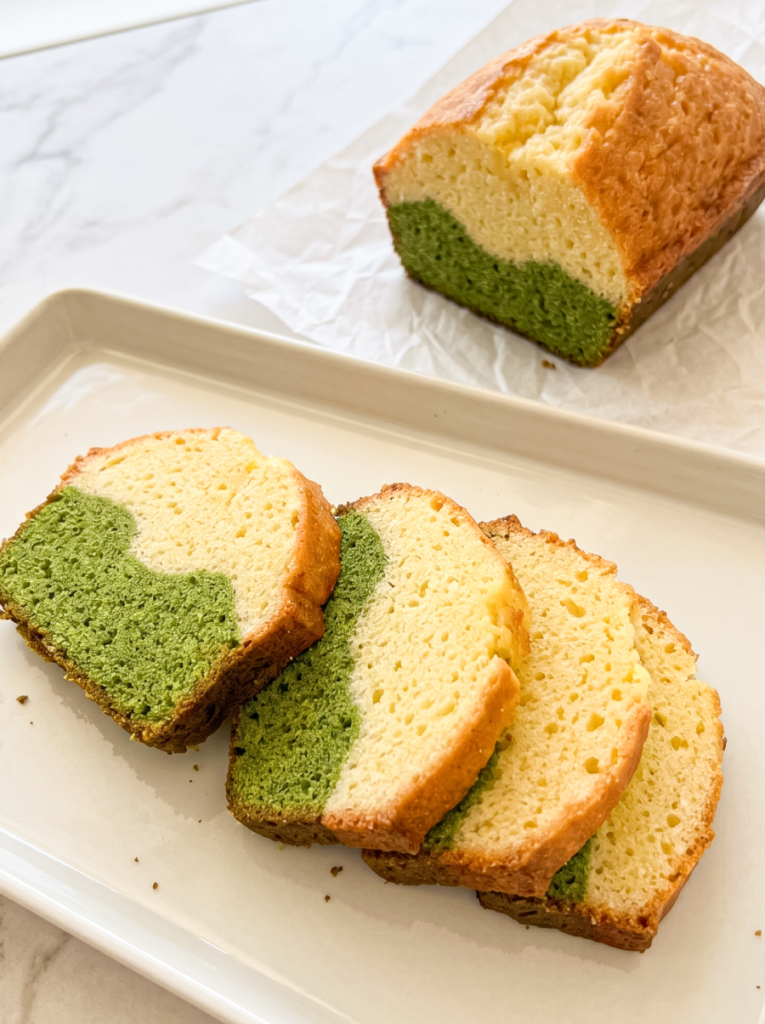
This is the kind of cake that looks super impressive but is actually pretty easy to make! You get these beautiful, distinct layers of matcha and white batter with just a quick swirl, and it makes people think you’ve spent hours on it. 🙂
Why You’ll Love This Matcha Recipe
- Strong matcha flavour – It tastes like a matcha latte, with that slightly earthy, sweet, and milky flavour going on that makes you want another slice.
- Tender crumb – This cake has such a soft texture that almost melts and isn’t dry at all.
- Lovely swirl – The green and cream batters create a pretty marble pattern with minimal effort.
Ingredients
- Unsalted butter
- Powdered sugar
- Large eggs
- All-purpose flour
- Baking powder
- Matcha powder, find this at your local asian cafe! I recommend culinary grade at the minimum.
*These are the main ingredients. The full list of ingredients and measurements can be found at the bottom of this post!*
Equipment
- Kitchen scale (I like to weigh out most of my ingredients for accuracy, I also think it’s more efficient when measuring things out over measuring cups!)
- Large and small mixing bowls
- Measuring cups and spoons
- Whisk
- Rubber spatula
- 9×5 inch loaf pan
- Electric mixer (stand or hand mixer)
- Parchment paper
- Wire cooling rack
Tips for Making This Matcha Latte Cake
Room temperature ingredients – Make sure your butter and eggs are at room temperature before you start. It helps them combine smoothly with the sugar, giving you a consistent, lump-free batter that bakes evenly.
Add eggs one at a time – Beat each egg in fully after each addition until it’s completely combined. This is a little trick to prevent the batter from splitting and keeps everything fully emulsified.
Don’t overmix the batter – Once you add the flour, fold gently until just combined. Overmixing will develop the gluten, which can make your cake tough, and we’re going for a tender, soft texture here.
Achieve a clear swirl – When you’re swirling the batters, don’t overdo it with your knife or skewer. Just one or two passes down the centre is usually enough to get that distinct marbled look without muddying the colours.
Matcha Latte Pound Cake FAQs
What kind of matcha should I use?
For the best flavour and colour, go for a good quality ceremonial or culinary grade matcha. The matcha is the star of this green tea pound cake, so a higher quality powder will make a noticeable difference.
Can I skip the chilling step?
You can definitely eat this matcha pound cake right away if you can’t wait, but I genuinely think the flavour and texture improve dramatically after it’s had a full day to chill in the fridge. It lets everything meld together beautifully.
How do I store leftover matcha pound cake?
Keep the cooled loaf cake wrapped tightly in plastic wrap or in an airtight container in the fridge for up to 5 days. You can also slice it and freeze individual pieces for a quick treat later.
My swirl didn’t look very defined, what happened?
A less defined swirl usually happens if you’ve over-swirled the batters or if there wasn’t enough contrast between them. Try doing just one or two gentle passes with your knife, and make sure your plain batter is truly plain for maximum visual impact.
If you bake this matcha latte swirl pound cake, please tag me @theflournook on social media and leave a review below! You can pin this recipe to save it for later using the button on the recipe card, the buttons above or below the post, or on any of the photos above.
Happy baking!
For more asian inspired dessert recipes, check out these:
You may also like
Matcha Latte Pound Cake
- Total Time: 1 hour 5 minutes
- Yield: 8 slices 1x
Description
A tender, flavour-forward matcha latte pound cake with a beautiful green marble. I love how the creamy matcha flavour shines through, and it’s genuinely simple to make.
Ingredients
- 1 1/2 cups (180 g) all-purpose flour
- 1 tsp (4 g) baking powder
- 2 tbsp (10 g) matcha powder
- 1 cup (226 g) unsalted butter, softened
- 1 3/4 cups (200 g) powdered sugar
- 4 large eggs, room temp
Instructions
- Preheat your oven to 350°F (175°C). Grease a 9×5 inch loaf pan, then line it with parchment paper, leaving an overhang on the long sides.
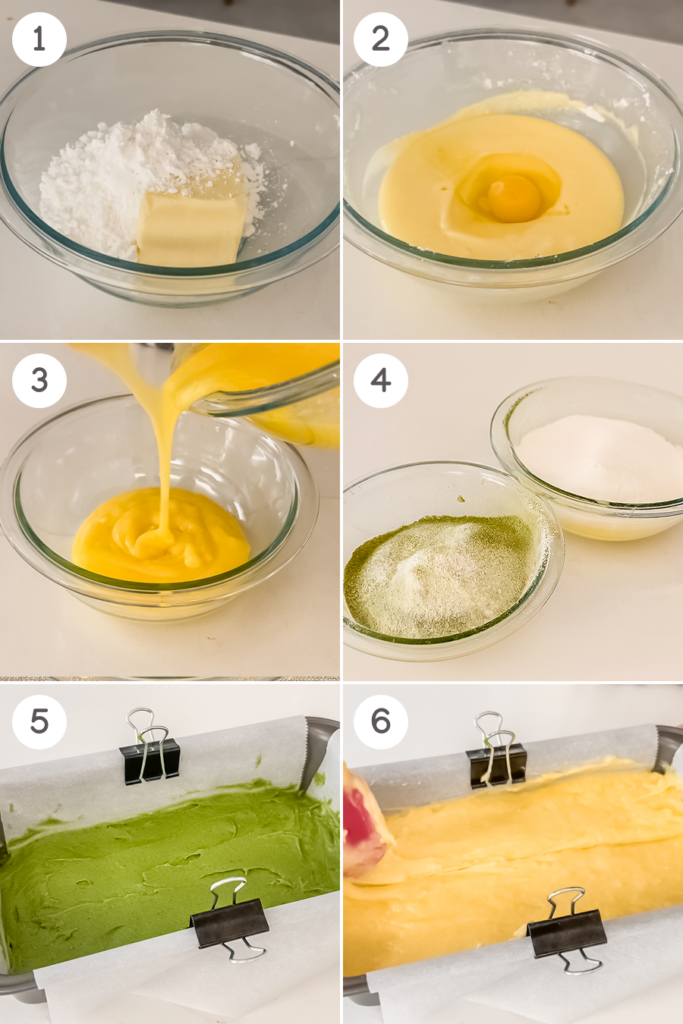
- In a large bowl, beat the softened butter and powdered sugar with an electric mixer on medium speed until the mixture is smooth and creamy.
- Add the eggs one at a time, beating well after each addition until fully combined.
- Divide the batter evenly into two separate bowls.
- Into the first bowl, sift 100 g of the all-purpose flour and ½ tsp (2 g) of the baking powder. Gently fold until just combined.
- Into the second bowl, sift the remaining 80 g all-purpose flour, remaining ½ tsp (2 g) baking powder, and the matcha powder. Fold until the matcha is evenly distributed and the batter is smooth.
- Transfer each batter into a separate piping bag. If you don’t have piping bags, use a spoon.
- Pipe or spoon the matcha batter into the prepared loaf pan first and smooth the top.
- Then, pipe or spoon the plain batter on top of the matcha layer.
- Use a knife or skewer to draw a line down the centre of the batter.
- Bake for 40 minutes, or until a toothpick inserted into the centre comes out clean.
- Let the cake cool in the pan for 10 minutes before transferring it to a wire rack to cool completely.
- For the best flavour, wrap the cooled cake in plastic wrap and refrigerate for at least 24 hours before serving.
Notes
Make sure your butter and eggs are at room temperature. This helps them combine smoothly with the sugar, giving you a consistent batter that bakes evenly.
When I add the eggs, I go one at a time and beat well after each addition. This prevents the batter from splitting and keeps it emulsified.
I find this cake tastes best after it has a day to rest in the fridge. The flavours deepen, and the texture becomes even better.
- Prep Time: 25 mins
- Cook Time: 40 mins
- Category: Cake
- Method: Baking
Leave a Reply